Hey Everybody who's reading/following this blog-I've moved! The 44 Bikes website got a facelift for starters-check it out! AND this blog has been moved to a wordpress format. So much more power/options on the Wordpress platform. All the posts were archived and moved to the new 44 wordpress blog as well so you can still see all the old content as it appears here but you can follow along with all the new happenings as I build up the shop at my house. I hope to have that finished sometime in the spring/early summer of 2011. Thus with this change, I will no longer be posting to this blog. I'll keep this here as an archive for the next few months, but eventually I will take it down in favor of the new format. You can still check out all kinds of good stuff via the 44 FLICKR too. I'll be adding an online shop to the site later this year, so check the 44 Shop occasionally for updates, downloads and some select exclusives.
So get on over to the new 44 BLOG!
12/18/2010
12/16/2010
UPDATE SEASON
Lot's going on over here in the studio. It's been a while but you'll really want to hear what's going on. So this past summer I've decided to put time/effort into getting my shop ready here in New Hampshire. Some upgrades to our current service needed to be done so that the shop can get some high power juice. That involved HAND DIGGING a 160ft. trench. Uphill. Both ways. That's finished, and all the 2" pipe has been laid before the winter hit. The line and the rest of the electricals will be finished early spring 2011. Late spring early summer 2011 the shop will get a new floor poured and a full buildout will be in order. I hope to have the first 44 roll out the doors in June of 2011. Keep your fingers crossed!
As for the website, I'm currently putting the finishing touches on a beta site and testing it. So far so good on Internet Explorer 7+, Safari, Opera, Google Chrome and Firefox. I've also got an online shop in the works along with some free downloads. Warranty info, pricing and the fit forms are finished and uploaded to the server. Kind of handy being a designer actually-I can handle all of this and make it exactly how I want it...
I'm also going to be shifting everything over to a Wordpress platform blog as well. I'll preserve this blog with the new WP platform so not to worry. Stay tuned and feel free to email me directly to get on a mailing list for when this stuff starts to roll out: khenry@44bikes.com
Follow along on my flickr feed for the latest rides, builds and happenings around the shop & studio.
As always-keep the rubber side down and the pedals turning.
As for the website, I'm currently putting the finishing touches on a beta site and testing it. So far so good on Internet Explorer 7+, Safari, Opera, Google Chrome and Firefox. I've also got an online shop in the works along with some free downloads. Warranty info, pricing and the fit forms are finished and uploaded to the server. Kind of handy being a designer actually-I can handle all of this and make it exactly how I want it...
I'm also going to be shifting everything over to a Wordpress platform blog as well. I'll preserve this blog with the new WP platform so not to worry. Stay tuned and feel free to email me directly to get on a mailing list for when this stuff starts to roll out: khenry@44bikes.com
Follow along on my flickr feed for the latest rides, builds and happenings around the shop & studio.
As always-keep the rubber side down and the pedals turning.
8/21/2010
44 Bikes :: Frame Jig Progress

Getting real close to having my frame jig finished. It's been a journey getting this thing finished. Power goes into the shop in one more week. This beast gets finished most likely in another 2. Then it's on to making two more pieces of tooling: Dedicated main tube mitering jig and a chainstay mitering jig. Then as Mr. Mandlebaum says in Seinfeld... "IT'S GO TIME". Check out more pics of the whole progress here.
7/19/2010
SHOP TIME
 Been a while since I've posted anything here. Rest assured, I've been busy with master plans. Here's the skinny as of 7.19.2010: I'm in the process of getting my shop setup here in NH. One of the reasons why we purchased our house was for me to actually have a shop. The property has an old horse barn on it, and I've already gotten rid of everything "horse" related. Fencing, posts, stalls, you name it... this barn had it.
 It's in need of a few things like a new floor, build out inside, sufficient power source and eventually it will need a new roof. BUT, we're working on upgrading our service here at the house so we can run a new line down to the shop. Mill and lathe will need phase converters. Speaking with some friends who have done the same, it sounds like it will provide plenty of power at 75% capacity for what I'm doing. So that's good news. My electrician will be stopping by this week for an inspection and then we can put together the finalized plan for getting more power to the shop. Then it's calling our friends over at PSNH for the service upgrade.
This is exciting stuff to say the least and basically my all time dream: Have my own shop. In a perfect world, I'll split time between my design business, BLACKCAP Studio, and 44 Bikes. The two compliment each other well and I'm all for building a small brand, with a close nit following around a strong product lineup. So when things kick off, you'll be sure to know first right here on this blog. In the works is a new site, a manifesto of sorts for the company that will equate to a biannual "Zine" of sorts among other things. What's really great is I'll be able to funnel all of my creative talents into a passionate project and love. I can't wait to get started. Actually I have started-so can't wait for the next steps to happen. It's going to be one hell of a ride.
So once power is to the shop, first and foremost will be finishing the frame jig and tooling build. Then it's Frame No. 001 to come from the shop. It will be a pretty cool moment when that happens.
In the meantime is scheming, strategery and riding plenty. I've been trying out the Snake Driver in every setup known to mankind. The above is yet another example of it's versatility. A builder out in Oregon pioneered this setup, of which I have much respect, Jeff Jones. I had the fork and Front wheel from my Pork winter setup and have been wanting to take them onto the dirt just of pure curiosity. Had a chance to ride this setup the previous night and it is one heck of a blast. A few tweaks with setup. The Paul Components chain guide is a nice little piece of chain retention-ery and I did not drop a chain on anything. There is also a newer bb-mounted version here.
So stay tuned as more news happens.
4/15/2010
Spring Riding

Been a while. Spring's here in the north and trail cleaning is happening round the clock. Riding is happening round the clock. Building bikes is happening. Heck-building frame jigs and tooling is happening. It's all happening. Just put up a new link on www.44bikes.com. I've been doing a pretty good job of posting plenty of shots on my flickr account. Get in there and start digging for all the latest and greatest. 44 FLICKR.
2 29ers are on the deck right now. Perhaps a 3rd. 29s's basically with some other options thrown in for good measure.
Up above you'll notice that Spring Time is Singlespeed season for the Snakedriver.
Ran into a bunch of riders tonight from New Hampshire Ball Bearing. Heck one of them was even from Lyndeborough. GO FIGURE. Good group of riders and great to meet them. Give me a ring man we'll all have to go for a ride!
29f1 finally got the modified 6 speed treatment to the rear cassette.

Not a completely current shot. But here's the 29f1 prepped just after the snow melted.

I'll be in the shop all day this friday, so keep your eyes peeled for some new shots via the 44 flickr page. Actually go to the main photo stream of my day job (BLACKCAP Studio) and you'll see the latest updates.
2/25/2010

1/27/2010
SNAKEDRIVER
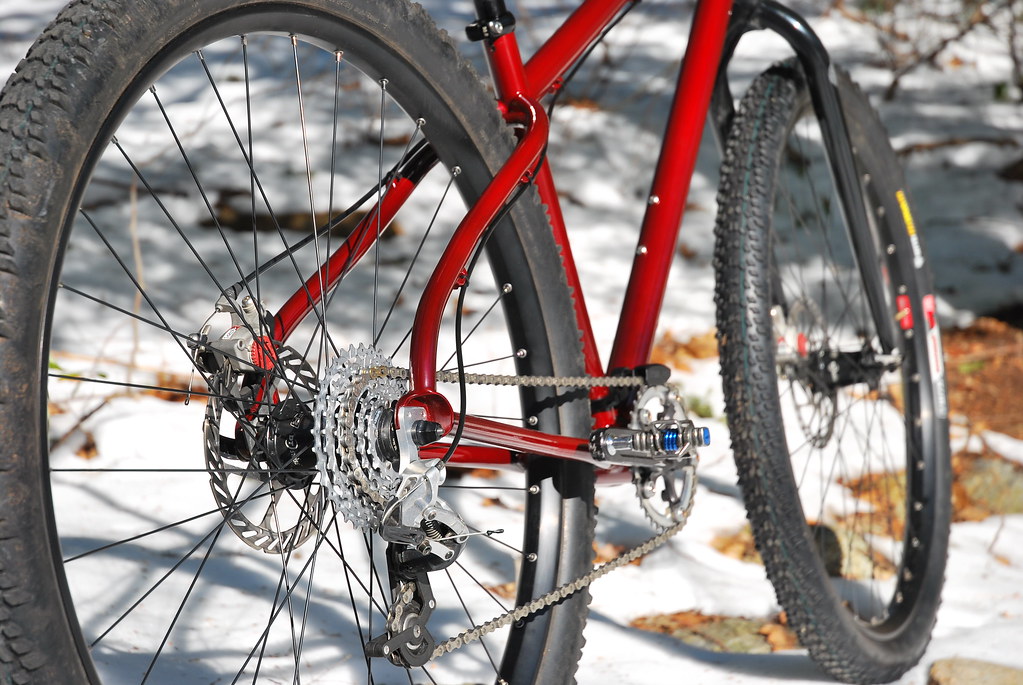
Long time-Snakedriver V2 is finished up. Been building a fork jig so I can build an oversized fork with 135mm spacing to accept an endomorph mounted on a 50mm wide Uma rim from Speedway Cycles. It's taking forever since I have to go back and forth from Studio to Shop, and concentrate on time spent on a Bridgeport that I know I can't leave a setup in overnight. So I have to finish what I start-so I can't tackle too much. And me being me I'm doing it to the 10th degree. But as Ted's said, a fork needs to be Binford strength so I'm dealing with hogging out lots of material on even BIGGER hunks of material. So it goes. But the Snakedriver is finsihed and built. Build is as follows:
Thomson 410mm Post
Thomson 90mm Stem
Race Face Turbine Square Taper Cranks (keep'n it old school)
113mm Shimano Bottom Bracket
Race Face 34t chainring
17-34t Shimano XT cassette (will most likely add a 14t cog)
Crank Brothers Egg Beaters
Avid levers
Sram XO 9spd shifter
Sram X9 9spd short cage rear derailleur
Sram Chain (love that universal link thing)
SDG Saddle
On-One Mary bars flipped
Yeti Speed grip lock-ons
Shadow Conspiracy bar-end caps
Avid Disk Brakes - 185 front / 160 rear
WTB Wolverine 2.5 tires front/rear
Salsa Gordo's / DT 14g spokes / brass nips / DT Swiss FR Hubs
Salsa Chromoto Grande Fork (temp. till the forks get built)
PAUL COMPONENTS CHAIN GUIDE!
GET IN UNDER THE RADAR AND CHECK OUT SOME MORE SHOTS BELOW:
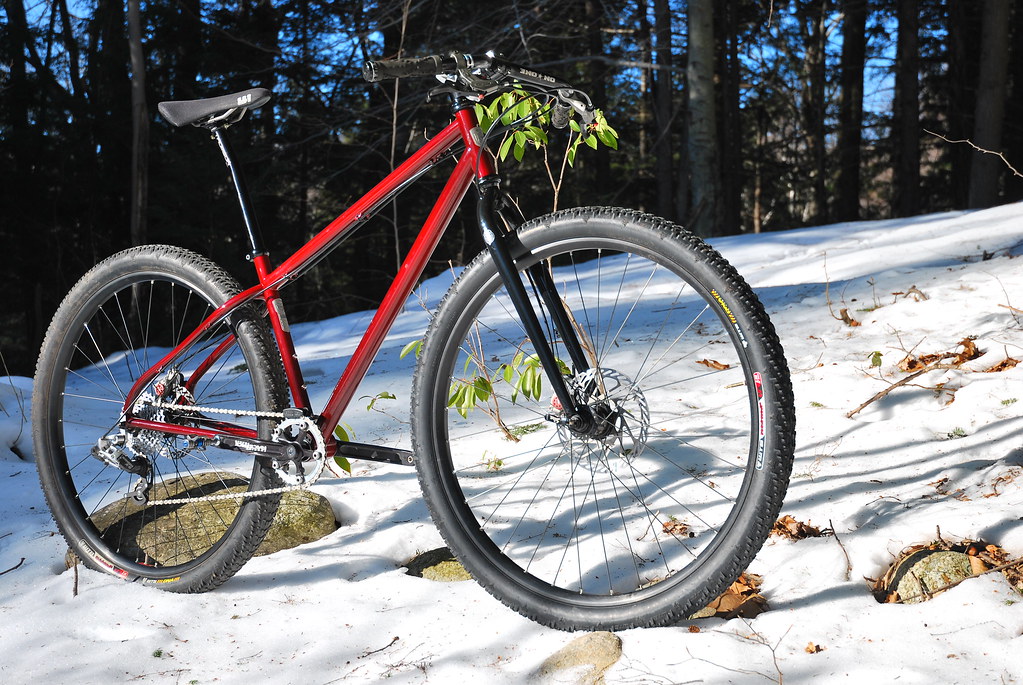
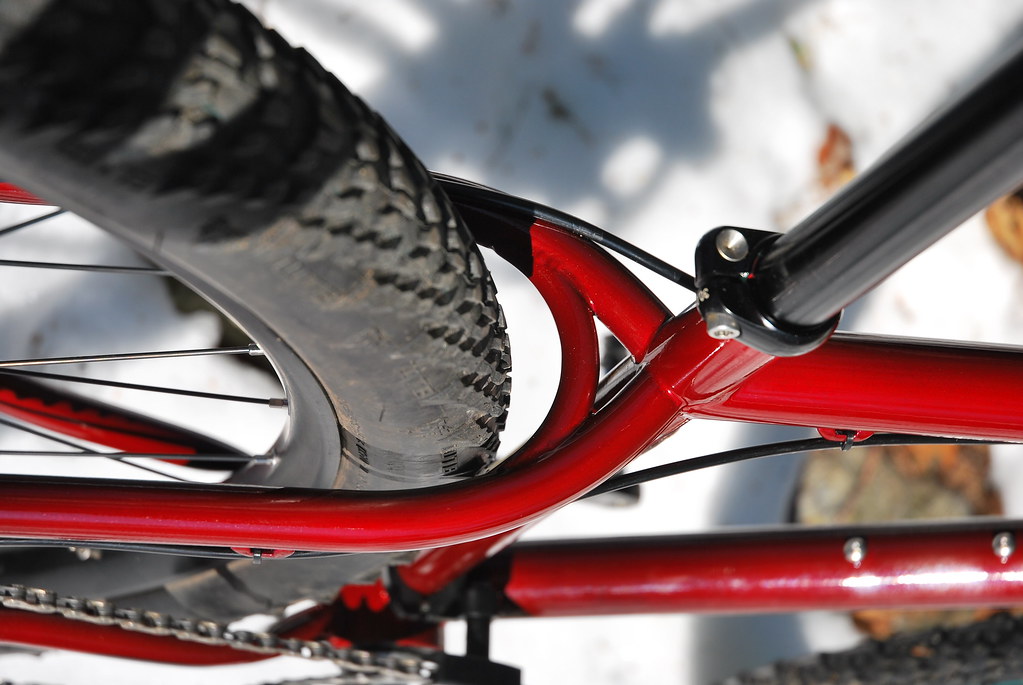
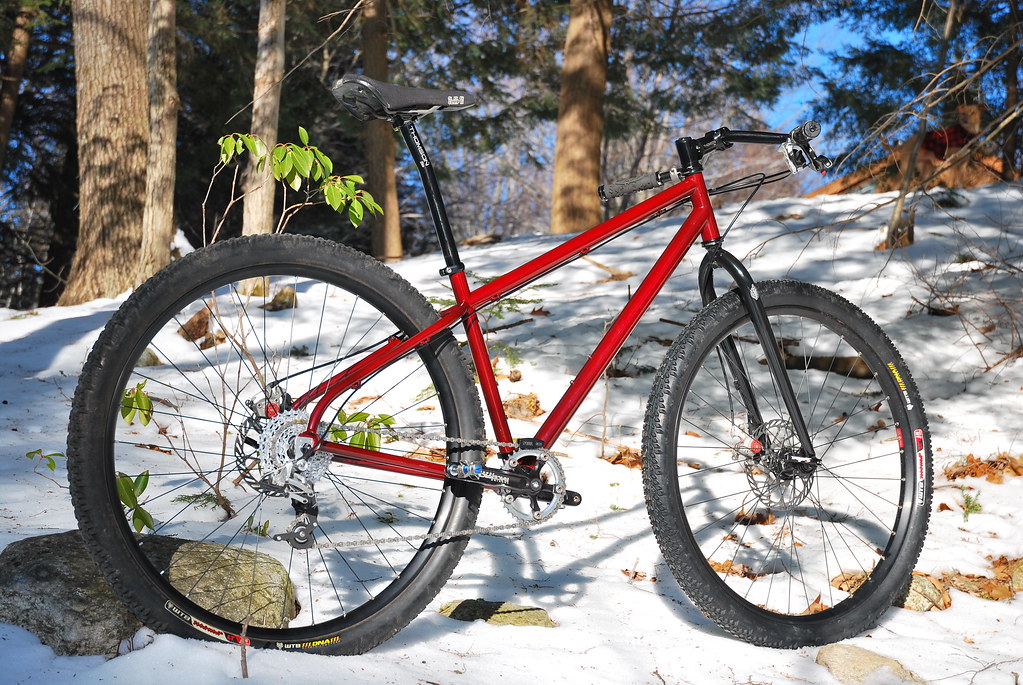
Also updated a large collection of shots on my flickr page. Check it out here.
11/21/2009
Long time

Been a while since a post was made. But hasn't been a while since there's been plenty of chips and sparks flying. Been riding a bunch too. Above is a recent ride we took with our pup Kaya. Found a nice little stump trailside to pop off of and we settled in for a little stump session while trying out our new camera. Fun stuff. Snake driver is still at paint. I came in right at the end of a cycle so its sit and wait for the painter to get enough to justify cranking up the oven. I'm not in a rush, but as long as I have it before snow starts to fall i'll be happy.
Also been building the HELL out of tooling recently. Toolin' up kids. Look out. Heat sinks are 99% finished for bottom bracket, head tube and seat tube. Seat tube is extra long. Check it out. Dig in there and check out all the recent happenin's. Last step will be to slot the two heat sinks and then its moving along to the next piece of tooling: Fork Jig. I'd move on to the frame jig, but I have to make up a pair of forks for the Snake Driver. So we'll use this opportunity to customize a nice piece of tooling for this. Should be fun. Then its go time on 2 forks with one spaced out at 100 and the other at 135 for the Porkfork. THEN GO TIME on the frame jig. This ones going to be pretty fun.
My one big rub with anvil jigs is you can't really take a reference point to determine all subsequent measurements. So this jig will have a base plate that all measurements can be based from. So depending on the temperature in the shop, the jig can be set very precisely. Ted noticed this big difference between his old jig and an anvil jig he was borrowing/lent to try out for a few months. Interesting to compare the two.
But many good things to come so stay tuned...
10/09/2009
Snake Driver is coming together

Thursday things really came together. Spent some time forming and mitering the seat stays. Wanted these to be a little special so I added the wishbone look.

Keeping them in plane takes some mind power. But after tacking up the chainstays, it was a weldfest on the mainframe finishing the HT/DT and Bottom Bracket junctions first.

Then finishing wrapping all the welds on the seat stays. Double checked alignment twice along the way and things were looking pretty good. Final check after all was welded up and things were still on target. Usually check this a few times throughout the process and tweak if necessary.

I've been getting better at using the heat to pull things back into alignment as I work. Finished up the welding and had some time left to miter/fit the chainstay bridge.

Mirrors the tires profile nicely with room for a 2.5 and then some...
9/25/2009
POST#44 - Snakedriver coming together
Was at the shop yesterday and was successful in mitering, prepping and tacking the front triangle assembly to the bb/cs assembly. I'm starting to get the whole process down better with each frame and getting in tune with the whole process. Some quick shots of the build progress:

Tacked up and waiting for next week

Bushnell EBB detail

Pieces parts.
The Speedway Cycles 50mm UMA 26" rim showed up today at the studio. Thanks so much Speedway for sending this on over out here on the right coast! Can't wait to build this up. Waiting on Paul Components next run of 135mm Whub front hubs to go into production. 4 weeks out apparently. Until then, its casting shadows.

Also had a very rich and enlightening conversation with Ted regarding Trail, Rake and handling. Very impressed with his knowledge on the subject. A lot of it comes from his flat track days on a motorcycle. No brakes, all controlled via power/throttle. That's balls. In a nut shell what your goal is as per Ted is a neutral handling platform. So when you lay into a turn it neither under or over steers and the bike is predictable. Basically scribing the same arc instead of independent ones, or at least that is how I can verbalize it. Wheel, inertia, rotational mass, HT angle, rake, trail... All that stuff plus more in a one big soup called handling. Definitely some black magic going on with this as its different from rider to rider...

Tacked up and waiting for next week

Bushnell EBB detail

Pieces parts.
The Speedway Cycles 50mm UMA 26" rim showed up today at the studio. Thanks so much Speedway for sending this on over out here on the right coast! Can't wait to build this up. Waiting on Paul Components next run of 135mm Whub front hubs to go into production. 4 weeks out apparently. Until then, its casting shadows.

Also had a very rich and enlightening conversation with Ted regarding Trail, Rake and handling. Very impressed with his knowledge on the subject. A lot of it comes from his flat track days on a motorcycle. No brakes, all controlled via power/throttle. That's balls. In a nut shell what your goal is as per Ted is a neutral handling platform. So when you lay into a turn it neither under or over steers and the bike is predictable. Basically scribing the same arc instead of independent ones, or at least that is how I can verbalize it. Wheel, inertia, rotational mass, HT angle, rake, trail... All that stuff plus more in a one big soup called handling. Definitely some black magic going on with this as its different from rider to rider...
9/18/2009
New Winter Build: SNAKEDRIVER


Oh that's right people. Going to be doing an update to the fabled Snakedriver. Rode a full season/winter on the proto #1 when I wasn't on the f1. (which sometimes was tough with all this good weather, good trails and good setup which I came to enjoy...) But one thing was for sure, riding in the winter has been getting tough. Not because of the cold or snow, but more so because of the setup. I had options but still there were some holes. So back to the drawing board. I was building more for nothing larger than a 2.1 in the back. You can squeeze a 2.3 out there, but I'd prefer more room. So this next build is going to put into action the same forming techniques I've been using with my mountain bikes and the stays. So we'll have room for 2.5's out back.
Next up is the bottom bracket. I'm going to lower the height to 12". 12.375 is pretty good for trails. But on snow/fast dirt roads, I really liked how a low bottom bracket sucks into turns and quickens steering. Still enough room for taking it off on trails, but its meant more for dirt roads and rambles. So it goes. But another opportunity to see how this feels on trail too. Bottom bracket will be switched to a Bushnell Ebb. Worked with this on Joe's Rohloff build and was digging its capabilities in certain applications. I can change stay length, bottom bracket height and go gears or singlespeed. So a little extra weight in this case is worth the added benefits.
Next up is the fork/head angle. Keeping it at 70.5 but going to be making 2 forks for her. One will be in the 450 a-c range but the second will be able to take an endomorph. That's right-we're making this fat tire compatible for snow conditions. I've been curious about this whole fat front thing, but more so for snow. So I've been in touch with Speedway Cycles up in Alaska and a 50mm Uma 26" black roled holed and drilled is on her way as we speak. I'll also be building with the new front iso standard of 135mm. Paul Components will be supplying their new WHUB. They're 4 weeks out so I couldn't place the order, but in 4 weeks... LOOK OUT MAN. I'm placing that order. Both forks will have the same a-c and rake. But accommodate the two axle widths for comparison of these two standards. Can't wait. I'll call this the 'pork fork' though-none of that fat nomenclature...
Next up is the overall look of the frame. The Snakedriver is more of a utility type ride, but I want this one to be a 44, so we're going to make it in a similar appearance of a 44s. Most likely no gusset at the st/tt junction. Just a clean line up there. Full housing and the ability to run a rear derailleur will be in order of course.
But-finished up the chainstay/bb assembly yesterday. Welds are coming together nicely and each pass is getting better. Been fiddling with the 'on-time / pulses per second' adjustments. Also been playing with feathering the pedal during pulses too. Interesting stuff and learning more about heat control. I'll be using 17-17.65 stays (ebb swing). They were mitered in at around 17.25. Bad pics attached above but hey-I'm working on that too. Just got a Nikon D60 body. Have to save up for a good lens now.
8/29/2009
Riding
Been riding a lot so there hasn't been news. Also been building too. Finished up Franky's 26s and Joe's Rohloff Build / 26s.

Lil'detail of the goods.

From the front.
Fun fact regarding Joe's: Good old fashioned New Hampshire Barter. You cut some trees that need cuttin' I'll build a frame that needs buildin'. I need cordwood, you need bike frame. DEAL! Fun stuff. A pretty good deal on his part too. This one can be run as a singlespeed as it has an ebb, it's got rack mounts for touring, comes with a spare derailleur mount thats removable so if he ever decides to go with a 'normal' setup, he can and its built up as a Rohloff with all the necessary doo hickeys.

Yep..Frank needs a slightly shorter stem.
Franky's 26s paint is a candy red powder. I have to say I'm particular to black, but red is my favorite color. I know what color the snake driver update will now be. Pic just doesn't do it justice.
But went down to PA for a little visit with the folks and the F1 was along for the ride. Kind of took me for a ride. Warmed up in and around my grandmothers house in the perkiomen valley reservoir. The stomping grounds where I learned the ins and outs of mountain biking. A quick 30 minute pedal from my parents house. Muddier than all hell, but it was fun. Then the second day of the trip-took for the hills of Emmaus just outside of my old employer, Rodale Press. South Mountain in Emmaus PA. Forgot how technical these trails can be. But rest assured, I was in full control 95% of the time. The other 5% I leave up to "ah shit... here we go." Good stuff. The climb from the parking lot near the playground is a good one. Crosses some downed trees that are all new to me, plenty of rock gardens, and some killer singletrack. i remember back in 99/01 someone purchased land where another trailhead was for years and quickly shut that down. I was away for a while and did not know this, and upon arriving I was harassed by a gentleman in a minivan who showed up as soon as I got out of the car faster than a jack rabbit on a hot date giving me the riot act. So we lost a lot of great singletrack. But no matter as new stuff appears to be built. But I did a large loop and was more than satisfied. Cleared a rock garden I'd only cleared once to date ONLY to be thwarted by two trees at the end of the rocks which my bars would not clear-I was pretty committed to the line at that point, and had a good pace. I approached the end looked up and realized that I couldn't even wheelie and turn the bars between these suckers... Pretty much just rode the bars right up to them, stopped balanced in a track stand.. noodled it (hot as all hell too sweating bullets) and just laughed and had to walk. Just when you think you have something licked mother nature grows some trees. Oh well.


Forgot my camera. Would have taken some on South Mountain with the F1. These will have to do till next time!
But the true test of any build is in some tech. South Mountain is no exception to this. The F1 climbed well, hooked up in corners and rolled smoothly in the rough. She was descending even better than I could due to how freakin' soaked my gloves were. I had some sweat management issues. No matter-it was great fun. Had to walk a few sections but who cares. I was on my home trails on a awesome day, on a bike I built with my own hands and not a person in sight for miles. That's good stuff I have to say. Can't wait to return in the fall. I'll have to give my bud Mr. Neyen and hey ho next time. We'll rip it up I'm sure.

Lil'detail of the goods.

From the front.
Fun fact regarding Joe's: Good old fashioned New Hampshire Barter. You cut some trees that need cuttin' I'll build a frame that needs buildin'. I need cordwood, you need bike frame. DEAL! Fun stuff. A pretty good deal on his part too. This one can be run as a singlespeed as it has an ebb, it's got rack mounts for touring, comes with a spare derailleur mount thats removable so if he ever decides to go with a 'normal' setup, he can and its built up as a Rohloff with all the necessary doo hickeys.

Yep..Frank needs a slightly shorter stem.
Franky's 26s paint is a candy red powder. I have to say I'm particular to black, but red is my favorite color. I know what color the snake driver update will now be. Pic just doesn't do it justice.
But went down to PA for a little visit with the folks and the F1 was along for the ride. Kind of took me for a ride. Warmed up in and around my grandmothers house in the perkiomen valley reservoir. The stomping grounds where I learned the ins and outs of mountain biking. A quick 30 minute pedal from my parents house. Muddier than all hell, but it was fun. Then the second day of the trip-took for the hills of Emmaus just outside of my old employer, Rodale Press. South Mountain in Emmaus PA. Forgot how technical these trails can be. But rest assured, I was in full control 95% of the time. The other 5% I leave up to "ah shit... here we go." Good stuff. The climb from the parking lot near the playground is a good one. Crosses some downed trees that are all new to me, plenty of rock gardens, and some killer singletrack. i remember back in 99/01 someone purchased land where another trailhead was for years and quickly shut that down. I was away for a while and did not know this, and upon arriving I was harassed by a gentleman in a minivan who showed up as soon as I got out of the car faster than a jack rabbit on a hot date giving me the riot act. So we lost a lot of great singletrack. But no matter as new stuff appears to be built. But I did a large loop and was more than satisfied. Cleared a rock garden I'd only cleared once to date ONLY to be thwarted by two trees at the end of the rocks which my bars would not clear-I was pretty committed to the line at that point, and had a good pace. I approached the end looked up and realized that I couldn't even wheelie and turn the bars between these suckers... Pretty much just rode the bars right up to them, stopped balanced in a track stand.. noodled it (hot as all hell too sweating bullets) and just laughed and had to walk. Just when you think you have something licked mother nature grows some trees. Oh well.


Forgot my camera. Would have taken some on South Mountain with the F1. These will have to do till next time!
But the true test of any build is in some tech. South Mountain is no exception to this. The F1 climbed well, hooked up in corners and rolled smoothly in the rough. She was descending even better than I could due to how freakin' soaked my gloves were. I had some sweat management issues. No matter-it was great fun. Had to walk a few sections but who cares. I was on my home trails on a awesome day, on a bike I built with my own hands and not a person in sight for miles. That's good stuff I have to say. Can't wait to return in the fall. I'll have to give my bud Mr. Neyen and hey ho next time. We'll rip it up I'm sure.
7/25/2009
44f1 Finished
So I finally finished my much anticipated new 29er frame: 44f1.

"F" for flair, "1" for one bend in the ST. I've ridden the first proto for some time now and decided it was time to make some changes from the very first proto Ted and I made last year. The first rendition threw me a curve ball resulting in a slightly slacker seat tube angle than I desired. So back to the drawing board. All that effort definitely paid off as naturally I not only learned a lot by making those mistakes, it also gave me more time on the first proto to start re-evaluating some of those early decisions/directions I had taken. So changes were in order-subtle but none the less, they are there for good reason. First up was an evaluation of how I ride and how that needs to be translated into the machine. Handling was desirable with the first proto but still not to where it needed to be. Original HT angle was set at 69. This was changed to 70.5 in an attempt to create what Ted refers to as a neutral handling bike. After my first experience on it this morning with its maiden voyage (turned into a 4 hour ride..) I now can really say with confidence that I've found a sweet spot. Always room for improvement I'm sure-but the front end tracks SO much better. I was experiencing some front wheel flop over very steep/short tech obstacles. On the back side of the obstacles at slow speeds I could feel the front end wanting to pitch either direction I was leaning. Not today people. Sucker just stuck on the ground and held its ground.

Next up was an evaluation of bottom bracket height on trail. High enough to clear obstacles and and avoid most pedal strikes, but low enough so it lowers the CG, quickens steering and sucks into turns. Again-12.5 bottom bracket height the first go around. This time-went with 12.25 to 12.375 (just depends on tire choice / tire pressure). It was pinned at 12.375 for today and I have to say I am very happy with this choice over 12.5". I can really notice a difference between the two-rear end tended to bounce a bit at times, but lowering the CG just a tad seemed to sink things in a bit more and allow the rear to stay planted. Maybe that's a bunch of BS, but that's how I interpret that change.
Now we come to a touchy one: Chainstay Length. The current set up was at 17.1" in length. This was pretty nice I have to say. But like all things, I wanted to push it and see what shorter would do. To achieve my desired CS Length-I needed to radius the seat tube. No easy task and what through the curve with the second proto. I ended up putting the radius at the bottom of the ST so effectively it pitches the Seat tube forward a hair, creates enough clearance so I can shorten up the chainstays and not have to put the ST/DT connection OVER the DT. So we can still create that nice big platform of welds around the bottom bracket and keep things relatively stiff. So with a radius in place, the trick was just getting the setup in the jig just right. All in all, I was able to go from a 17.1 to a 16.625. Dedicated 1x9 (in my case 1x5..) is the drawback because the radius really throws the angle for a Front Derailleur off. The rub was now with a shorter pair of stays, the rear would be a little stiffer and not as resilient.

This brings us to the next evolution of the design: two bends in the seatstays. Between the seat post extension and the two bends in the stays, I definitely experience a supple ride today. STOKED to say the least. Power transfer was still on point but there was that nice snappy feel of steel with a supple feel. Very comfortable ride.
That brings us to the dropouts: The 'Flip Switch' as I call them. Basically you run them in their normal position to have full gears. Want a singlespeed without horizontal drops or an ebb? Flip 'em and switch them. Right to left, left goes to right. You now have a traditional singlespeed setup. Orientation of the caliper is directly over the top of the disk. So with the use of a half link or half link chain (like a shadow conspiracy interloc) you can really dial in the chainline without having too much horizontal movement. Not necessary-but something I was noodling for a while and just wanted to try out. Big thanks to Super Rat Machine. Phil's work is awesome, top notch and a pleasure to work with. Props to SRM for their work.
Last details I made were a slightly lower slung frame. Well, close to 2 more inches of clearance over the top tube. Radius on the seat stay bridge and disk brake reinforcement. The Seat stay bridge really mirrors the profile of the tire nicely. More work but its a nice detail. Next go I'll push it up a little further-tire clearance can handle a 2.5 (2.3 installed presently) but clearance under the bridge is tight. Makes it but I'd prefer more. Chainstays are hand bent and formed. Lots of clearance for a 2.5 down there. Last but not least are the addition of the new Head and Seat badges. ST Badge sports a blank space for a lucky number to be punched. An outfit on the left coast put these together for me: Acu-Line. Photo etched stainless steel. They weigh nothing, and basically you pay a one time fee for the setup and then its per sheet. As many as you can fit on an 11x18 sheet. I got about 50 badges. Super nice and easy to work with-Ted might be using them for a run of HT badges too. Really nice etch quality.

The ride today: I was all smiles that is for sure. I dropped about a pound with this build. Lighter really has a nice effect that is for sure! Overall she felt very nimble, supple and snappy, descended well and those short chainstays just hook up for climbs or popping over obstacles. Wheelbase is 42.625" and rider compartment is 23.25 (that's optimized for me) and a 0 degree 90mm stem. I've found TT numbers a bit misleading-it's really more about the rider compartment in my eyes. I've found I prefer a little more of an up right stance. Relieves some pressure on my lower back and i'm more in a "ready position" when riding. You're very dynamic on a mtn. bike, so it makes sense to me to place the rider in a comfortable position where he/she can see obstacles, be free to move forward/back and play with body english. Low slung frame with an upright stance makes sense in my eyes. Back to the ride: good through corners. The lower BB brings the CG a little lower, and coupled with the steeper head angle, it was cornering a lot better than previously. I really could feel it tracking tighter through turns and being able to pick lines a lot better. (Good suggestion Ted! He's a Master Framebuilder for good reason!)

Overall: just a blast to ride. Fast, snappy and ready for more. More time on the frame will give me more information-but the above is first impressions. I'm stoked.. The group was beat afterwards naturally. Our buddy Brett hadn't ridden in a while and had a little unscheduled appointment with his breakfast again.. Joey T. is getting over Lyme Disease and was having a blast. Franky was enjoying his 44s in candy red. (I know what type of paint will be my next rambler!) The Punisher was out in FULL FORCE. Don't mess with the Punisher-she'll eat you alive. Post ride I delivered Joey T's much anticipated 44s Rohloff build. He was definitely stoked. Little good ol'fashioned swap. You cut some trees that need cuttin', and I'll cut some metal for a custom build for ridin'. Worked out awesome.

"F" for flair, "1" for one bend in the ST. I've ridden the first proto for some time now and decided it was time to make some changes from the very first proto Ted and I made last year. The first rendition threw me a curve ball resulting in a slightly slacker seat tube angle than I desired. So back to the drawing board. All that effort definitely paid off as naturally I not only learned a lot by making those mistakes, it also gave me more time on the first proto to start re-evaluating some of those early decisions/directions I had taken. So changes were in order-subtle but none the less, they are there for good reason. First up was an evaluation of how I ride and how that needs to be translated into the machine. Handling was desirable with the first proto but still not to where it needed to be. Original HT angle was set at 69. This was changed to 70.5 in an attempt to create what Ted refers to as a neutral handling bike. After my first experience on it this morning with its maiden voyage (turned into a 4 hour ride..) I now can really say with confidence that I've found a sweet spot. Always room for improvement I'm sure-but the front end tracks SO much better. I was experiencing some front wheel flop over very steep/short tech obstacles. On the back side of the obstacles at slow speeds I could feel the front end wanting to pitch either direction I was leaning. Not today people. Sucker just stuck on the ground and held its ground.

Next up was an evaluation of bottom bracket height on trail. High enough to clear obstacles and and avoid most pedal strikes, but low enough so it lowers the CG, quickens steering and sucks into turns. Again-12.5 bottom bracket height the first go around. This time-went with 12.25 to 12.375 (just depends on tire choice / tire pressure). It was pinned at 12.375 for today and I have to say I am very happy with this choice over 12.5". I can really notice a difference between the two-rear end tended to bounce a bit at times, but lowering the CG just a tad seemed to sink things in a bit more and allow the rear to stay planted. Maybe that's a bunch of BS, but that's how I interpret that change.
Now we come to a touchy one: Chainstay Length. The current set up was at 17.1" in length. This was pretty nice I have to say. But like all things, I wanted to push it and see what shorter would do. To achieve my desired CS Length-I needed to radius the seat tube. No easy task and what through the curve with the second proto. I ended up putting the radius at the bottom of the ST so effectively it pitches the Seat tube forward a hair, creates enough clearance so I can shorten up the chainstays and not have to put the ST/DT connection OVER the DT. So we can still create that nice big platform of welds around the bottom bracket and keep things relatively stiff. So with a radius in place, the trick was just getting the setup in the jig just right. All in all, I was able to go from a 17.1 to a 16.625. Dedicated 1x9 (in my case 1x5..) is the drawback because the radius really throws the angle for a Front Derailleur off. The rub was now with a shorter pair of stays, the rear would be a little stiffer and not as resilient.

This brings us to the next evolution of the design: two bends in the seatstays. Between the seat post extension and the two bends in the stays, I definitely experience a supple ride today. STOKED to say the least. Power transfer was still on point but there was that nice snappy feel of steel with a supple feel. Very comfortable ride.
That brings us to the dropouts: The 'Flip Switch' as I call them. Basically you run them in their normal position to have full gears. Want a singlespeed without horizontal drops or an ebb? Flip 'em and switch them. Right to left, left goes to right. You now have a traditional singlespeed setup. Orientation of the caliper is directly over the top of the disk. So with the use of a half link or half link chain (like a shadow conspiracy interloc) you can really dial in the chainline without having too much horizontal movement. Not necessary-but something I was noodling for a while and just wanted to try out. Big thanks to Super Rat Machine. Phil's work is awesome, top notch and a pleasure to work with. Props to SRM for their work.
Last details I made were a slightly lower slung frame. Well, close to 2 more inches of clearance over the top tube. Radius on the seat stay bridge and disk brake reinforcement. The Seat stay bridge really mirrors the profile of the tire nicely. More work but its a nice detail. Next go I'll push it up a little further-tire clearance can handle a 2.5 (2.3 installed presently) but clearance under the bridge is tight. Makes it but I'd prefer more. Chainstays are hand bent and formed. Lots of clearance for a 2.5 down there. Last but not least are the addition of the new Head and Seat badges. ST Badge sports a blank space for a lucky number to be punched. An outfit on the left coast put these together for me: Acu-Line. Photo etched stainless steel. They weigh nothing, and basically you pay a one time fee for the setup and then its per sheet. As many as you can fit on an 11x18 sheet. I got about 50 badges. Super nice and easy to work with-Ted might be using them for a run of HT badges too. Really nice etch quality.

The ride today: I was all smiles that is for sure. I dropped about a pound with this build. Lighter really has a nice effect that is for sure! Overall she felt very nimble, supple and snappy, descended well and those short chainstays just hook up for climbs or popping over obstacles. Wheelbase is 42.625" and rider compartment is 23.25 (that's optimized for me) and a 0 degree 90mm stem. I've found TT numbers a bit misleading-it's really more about the rider compartment in my eyes. I've found I prefer a little more of an up right stance. Relieves some pressure on my lower back and i'm more in a "ready position" when riding. You're very dynamic on a mtn. bike, so it makes sense to me to place the rider in a comfortable position where he/she can see obstacles, be free to move forward/back and play with body english. Low slung frame with an upright stance makes sense in my eyes. Back to the ride: good through corners. The lower BB brings the CG a little lower, and coupled with the steeper head angle, it was cornering a lot better than previously. I really could feel it tracking tighter through turns and being able to pick lines a lot better. (Good suggestion Ted! He's a Master Framebuilder for good reason!)

Overall: just a blast to ride. Fast, snappy and ready for more. More time on the frame will give me more information-but the above is first impressions. I'm stoked.. The group was beat afterwards naturally. Our buddy Brett hadn't ridden in a while and had a little unscheduled appointment with his breakfast again.. Joey T. is getting over Lyme Disease and was having a blast. Franky was enjoying his 44s in candy red. (I know what type of paint will be my next rambler!) The Punisher was out in FULL FORCE. Don't mess with the Punisher-she'll eat you alive. Post ride I delivered Joey T's much anticipated 44s Rohloff build. He was definitely stoked. Little good ol'fashioned swap. You cut some trees that need cuttin', and I'll cut some metal for a custom build for ridin'. Worked out awesome.
7/22/2009
PAINT/BADGES
New badges arrived. Stoked. Clean. Simple. Better. Not to mention the seat tube badge now states where they're made. Even if it's one at a time-that stamp of "Made in the USA" is more important than ever before.

Head tube badge in non-titled version.

Seat tube badge with rider option of a 'owner number'. Pick your lucky number. Ours happens to be 44..
This ones the fully revised 44f1. Can't wait for the face/chase so I can build it up. Also back from paint were two 44s's. Rohloff frame in wet black and the other in a candy red. Amazing finish provided by Jim at Rev Auto Limit/Extreme Powder Coating. Great work again fella's. More pics to follow shortly..

Head tube badge in non-titled version.

Seat tube badge with rider option of a 'owner number'. Pick your lucky number. Ours happens to be 44..
This ones the fully revised 44f1. Can't wait for the face/chase so I can build it up. Also back from paint were two 44s's. Rohloff frame in wet black and the other in a candy red. Amazing finish provided by Jim at Rev Auto Limit/Extreme Powder Coating. Great work again fella's. More pics to follow shortly..
7/04/2009
Bridges

That was the line of business today. Formed. Fitted. Ready for action. Really like how this turned out. Mirrors the profile of the tire well. The disk brake bridge also is curved too. (shown just before she was tacked in place utilizing a framebuilders 3rd hand..) I must admit that these were relatively the same amount of work as I have found making a straight bridge. A little extra effort as per the curve, but I think that little extra step is worth it in the end. More on this next week. All that's left with the 29f1 and 26s for Franky is to fit/weld up the disk mounts. Then these are ready for paint. Better even ready to ride.
Happy 4th everyone. Get out and ride before the picnics and fireworks start..
6/17/2009
OFF TO PAINT
This ones out the door for paint this week. Rohloff build is finished up. Gloss black of course..


5/23/2009
PROGRESS
Progress shot from the Rohloff build. This ones a 26s but with an ebb/Rohloff 500/14. Very impressed with the fit/finish of Rohloff's product. Wheel build courtesy of Peter White Cycles. Ted Wojcik thumb of approval naturally.

This ones going to be a special build. Rack mounts throughout for a touring option (not road touring though-we're talkin' touring on dirt and trails. None of that sissy road stuff) Room for 2.5 tires, fender if needed and lots of standover. Classic 71/73 New England geo for tight twisties but given that this will be a Rohloff build we'll be going with #1. Rohloff 14 speed hub. That gives the option of gears. With an ebb, you can switch things out and just take it up a notch for a singlespeed. Matching plate sans hanger will be there for a clean look. Then if that wasn't enough, we've got braze on's through out for the addition of derailleurs in case the Rohloff needs to be shed. So that's 3 bikes in one. Not too shaby.

This ones going to be a special build. Rack mounts throughout for a touring option (not road touring though-we're talkin' touring on dirt and trails. None of that sissy road stuff) Room for 2.5 tires, fender if needed and lots of standover. Classic 71/73 New England geo for tight twisties but given that this will be a Rohloff build we'll be going with #1. Rohloff 14 speed hub. That gives the option of gears. With an ebb, you can switch things out and just take it up a notch for a singlespeed. Matching plate sans hanger will be there for a clean look. Then if that wasn't enough, we've got braze on's through out for the addition of derailleurs in case the Rohloff needs to be shed. So that's 3 bikes in one. Not too shaby.
4/13/2009
29f1
Check this out: 16.75" Chainstays with the help of a shaped seat tube, room for 2.5+ tires, massive standover, and angles suited to picking your line in the New England tech. Can't wait for this one to be done. 29" for the wheels, 'F' for flaired stays, and the '1' stands for one shaped tube. No graphics-just hot rod black and stainless etched badges. Giddy up.

Pieces parts for the main triangle.

Welds are getting better - more practice though.

Pieces parts for the main triangle.

Welds are getting better - more practice though.
4/06/2009
BUILT
44 26f

Another view - mean and clean.

Here's a rare sight... 2 44's side by side.

You'll notice something about 44's: No graphics with the exception of two badges. One on the seat tube and of course one on the headtube. Why? Why not. Flat black is to hotrods as no graphics are to 44's. It's that simple. These are hot rods not billboards. Each one is spec'd custom for the ride and built for fun.

Another view - mean and clean.

Here's a rare sight... 2 44's side by side.

You'll notice something about 44's: No graphics with the exception of two badges. One on the seat tube and of course one on the headtube. Why? Why not. Flat black is to hotrods as no graphics are to 44's. It's that simple. These are hot rods not billboards. Each one is spec'd custom for the ride and built for fun.
3/31/2009
PAINT
From the front

Another view...

Wet Black Powder is juicy.. build pics to follow. Someones going to be stoked this weekend.
Subscribe to:
Posts (Atom)

 Posts
Posts

